Monday, November 14, 2011

A Sandwich Favorite

Well it gets harder and harder for me to make time to blog when I'm chasing a 13 month-old munchin around! And with a fried computer I ended up borrowing one today to share a fabulous recipe!

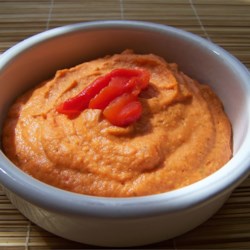
One of my favorite sandwich spreads is Roasted Red Pepper Hummus. There are several terrific store brands that I use - but homemade is almost as easy and tastes fresher and more delicious!


You will need:
2 Cloves of garlic
1 (15oz) can of garbanzo beans - drained
1/3 Cup Tahini (sesame seed paste)
1/3 Cup lemon juice
1/2 Cup roasted red peppers (canned are fine)
Optional - 1/2 teaspoon dried basil

To make:
In an electric food processor, combine garlic, garbanzo beans, tahini, and lemon juice. Process until the mixture is well combined and smooth. Add red peppers and basil if you desire and process until the peppers are finely chopped. Season with sea salt and fresh cracked pepper. Transfer hummus to an air tight container and chill until ready to serve. Spread on sandwiches, crackers, veggies, toasted garlic bread etc!


Enjoy!

Thursday, October 13, 2011

Custom Holiday Napkins

Craft Time!
Looking around online for some autumn craft ideas I came across this one for the dinner table. How fun! I'm thinking of making some with a little leaf in the corner for the season :) For all the instructions and a video on how to make just visit Martha Stewart's website.


Tools and Materials2 yards fabric (makes approximately 6 napkins)
Wishbone stencil template
Rotary cutter
Shiny satin or woven fabric
Pins
Needle and thread
Sewing machine
Bias-tape maker
Niagara sizing spray
Iron
Pencil
Scissors
Gold acrylic paint
Grid ruler

Holiday Napkin How-To1. Using a rotary cutter, cut a 21-by-21-inch square of desired fabric. Cut across fabric at a 45-degree angle (a bias cut), being sure to cut in the direction of the weave of the fabric.

2. To make the napkin trim, use a grid ruler to cut 2-inch strips of your selected shiny satin, enough for 84 inches. With the right sides facing each other; take the edges, place together to form a V shape and pin. Sew a 1/4-inch seam along the pinned edge. Keep connecting strips together until you have one long strip measuring 84 inches.

3. Place the long strip into a bias-tape maker and pull through. Using Niagara sizing spray, press strip with iron to set a hard fold. Fold trim in half, spray with sizing spray, and press with iron to create a nice, stiff fold, which is ready to be sewed onto napkin.

4. Place trim around napkin and pin, making sure trim ends meet at center of napkin and leaving about four inches of trim at center of napkin. Make mitered corners and place into sewing machine. Sewing as close to the inside edge of the binding as you can, sew all the way around the napkin.

5. Using a pencil mark where trims overlap, place right sides together and sew seam across. Cut off excess. Flip napkin back over and finish sewing.

6. Download and print wishbone stencil template. Place stencil at right bottom corner of napkin. Using gold acrylic paint, stencil wishbone onto napkin. Allow napkin to dry for about 10 minutes and repeat one more time. Peel stencil off napkin.
http://www.marthastewart.com/267747/custom-holiday-napkins
Many Blessings! And Enjoy!

Thursday, September 29, 2011

For "Granola Crunchers" Everywhere

The Best Granola Recipe In the World
Try it... You'll see :)
{Now G-Free! This is a revision from my 2011 recipe}


What You’ll Need:
  8-9 Cups rolled oats
      1/2 Cup ground flax seed (a coffee or spice grinder works great)
·         1 Cup sunflower seeds
      1/3 Cup pumpkin seeds
·         1 Cup finely chopped almonds
·         1 Cup finely chopped walnuts
·         1 Cup finely chopped pecans
·         1 ½ teaspoon kosher salt (less if you are using salted seeds or nuts)
·         ½ Cup brown sugar
·         ¼ Cup PURE maple syrup
·         ¾ Cup local honey
·         1 Cup coconut oil (or Non GMO canola oil)
·         1 Tablespoon ground cinnamon
·         1 Tablespoon good vanilla
·         2-3 Cups total dried fruit: raisins, cranberries, blueberries, cherries, pineapple, mango, or coconut, etc! I mix it up every time :) {also experiment with different nuts!}


How to Make:
  1. Preheat the oven to 325’ F (165’C). Line 2 large baking sheets with parchment paper or aluminum foil.
  2.  Combine oats, flax seeds, sunflower seeds, almonds, walnuts, and pecans in a very large bowl and mix well.
  3.  In a medium sauce pan stir together salt, brown sugar, maple syrup, honey, oil, cinnamon, and vanilla. Bring to a boil. Remove from heat and pour over dry ingredients, stir to coat and mix well. Spread mixture out evenly on the baking sheets.
  4.  Bake in the preheated oven until crispy and toasted, about 20 min. Stir once with a spatula halfway through. Cool, then stir in the dried fruit before storing in an airtight container.


    Enjoy!

    Monday, August 15, 2011

    Kitchen Craft: Cooks' Helper Magnet

    Craft Time!


    Found this great little craft on MarthaStewart.com! I'm always converting things or needing to know measurement equivalents and things and this little doodad will help anyone with just that.

    Just down load the printable page at:  http://www.marthastewart.com/271961/cooks-helpers
    Then print onto magnetic paper to stick on your fridge or card stock to put in the pocket of your favorite cook book.

    Enjoy!

    Wednesday, August 3, 2011

    Linguine for Two

    Some nights a quick dinner is all you have time for, but a husband with a full belly = a happy husband. So last night I whipped together a simple meal in about 20 minutes.

    What you will need:
    Olive Oil
    Butter 
    4 or 5 fresh sage leaves

    1/2 bunch of Asparagus
    1/2 box of Linguine Noodles
    Garlic Salt
    Herbs d' Provence
    Lemon Juice


    To Make:
    Begin by bring a large pot of water to boil and add 2 tablespoons of olive oil to it so the noodles don't stick together. Also add salt to flavor the noodles.
    Quick Tip: Only add salt after the water is boiling or you will get pits in your pot.

    While the water starts going, heat a large skillet over medium heat, add 3 or 4 tablespoons of butter, 1 minced clove of garlic, and add the sage leaves or another favorite herb of yours. Simmer and let the butter begin to brown and the herbs wilt and crispy.

    Add the noodles to the boiling water about now. They take approximately 7 minutes.

    And heat another skillet over medium heat and drizzle about a tablespoon of olive oil in it. Cut the ends off the asparagus and add to the pan, also add a splash of lemon juice to brighten the flavor, a shake or two of garlic salt and a few shakes of Herbs d' Provence. Toss occasionally until bright green and slightly roasted. Then just put a lid on it and remove from heat.
    Quick Tip: If you take a stalk of asparagus as bend, the end will pop off exactly where it starts to get woody. Then use that piece as your guide as to where to cut the rest.

    Drain the noodles. Add to the butter sauce, mix together and serve. Its that easy! Serve with a green salad, and maybe some pita chips with hummus, and you're good to go!

    Enjoy!

    Monday, August 1, 2011

    Tonight's Dinner

    What a crazy couple of weeks! Busy with a teething baby and weddings! So much fun that was had by all... Both weddings were out at our friend John Barbier's Palisade winery, events venue, and home, Amy's Courtyard & Winery Maison la Belle Vie. Beautiful setting, delicious dinner, dancing, and of course the love between fabulous brides and their grooms. :)

    Now back to food! Watching Food Network this morning I found what we're having for dinner tonight. I don't know that I've ever made Hamburger Helper... But this HAS to be just as quick and easy!

    Lemon Chicken Breasts on the Food Network

    This is dinner for tonight - with a side salad and couscous. Thanks Ina Garten for this fabulous recipe!

    Thursday, July 21, 2011

    Great Gift Idea: Taste Books

    I'm a huge fan of Bon Appétit Magazine, and a few years ago came across the site Epicurious.com in an issue. At Epicurious.com you can put together all your own personal recipes, or add some you find on their site, and have it published into a nice bound Taste Book. In my opinion, one of the best gifts a person could get, is a personalized cookbook! This makes a perfect wedding or bridal shower gift too. They also have a number of ready-made Taste Books to choose from with an endless number of fabulous recipes to choose from! Here's an example of their book The Best of the Farmer's Market.


    Check them out sometime and find some spectacular ideas!

    http://www.epicurious.com/services/tastebook

    Monday, July 18, 2011

    Dinner with Risotto

    Well... thought we should start this week off strong with a recipe for Basic Risotto! I've always loved the creamy rich texture of risotto with really anything in it, but never made it myself. Until tonight :) Looking though Giada De Laurentiis' cookbook, Everyday Italian, I found what I was looking for. A basic recipe that you can really put just about anything in.

    On Tonight's menu:
    A Green Salad topped with sliced grilled chicken a side of Risotto with Saffron & Asparagus and Grilled Peppers.


    What you will need for Basic Risotto:

    3 tablespoons unsalted butter (1 tablespoon reserved)
    1/2 Cup yellow or white onion - finely chopped
    1 1/2 Cups Arborio rice (or another medium grain rice)
    1/2 cup dry white wine (one that you will be willing to drink with your meal is wise.)
    4 Cups low sodium chicken stock
    1/2 Cup freshly grated Parmesan cheese
    fresh ground salt & pepper to taste
    *Pretty much any vegetable, seafood and/or spice you desire. These you will want to cook separately in a little butter or oil, and add at the end, so as not to get mushy.


    To Make:


    Start by bringing the chicken stock to a simmer in a sauce pan, cover and let sit on simmer until needed. In a separate medium pan over medium heat melt 2 tablespoons of butter.

    Add in the onion and stir until soft, but do not brown. Then add the rice, stirring constantly, and toast but not brown. Then add white wine, and let almost completely evaporate.

    Once the wine is almost evaporated, add 1/2 cup of chicken stock at a time, stirring constantly. Let each cup absorb into the rice before adding the next.

    As the stock absorbs the rice will start to release its starches and get creamy! After the last of the stock has been added and absorbed, add in your vegetables that you have cooked separately, the Parmesan cheese, and last tablespoon of butter.

    YUM!

    The End Result!

    Enjoy!

    Friday, July 15, 2011

    Fancy French Toast

    Fancy French Toast is a new favorite of mine! The original recipe I got from Claire Robinson of 5 Ingredient Fix. Of course I didn't write down the recipe because I was so busy swooning over the television, so I'm winging it a bit. It is so simple yet so delectable! Perfect for making a weekend morning special or perhaps a loved ones birthday memorable. :)

    The end result. YUM.


    For Fancy French Toast you will need:
    • 1 loaf of Brioche - sliced approx. 1 inch thick (My other favorite to use is Italian Sweet Bread with raisins and cranberries - today I'm using Cinnamon Swirl Bread from a local bakery.)
    • 4 eggs
    • 1/3 Cup of Half & Half
    • 1 teaspoon of vanilla
    • 1 Cup strawberries - washed with stems removed, and sliced
    • 1 Cup blueberries - washed with stems removed
    • 1/4 Cup granulated sugar - (I like to use agave nectar)
    • About a tablespoon of butter for the pan
    To Make:

    Slice the bread into 1 inch in thickness.

    In a pie plate, or shallow pan of some sort, crack the eggs, and Half & Half and vanilla. Whisk until combined.
    In a sauce pan stir together berries and sugar and let sit on low heat, stirring occasionally. This will be a heavenly topping! And the berries do all the work for you!


    Dip each slice of bread in the egg mixture - letting it soak it just a bit on each side.

      Place each slice on a heated and lightly buttered pan or electric skillet. About 2-3 minutes per side until golden brown.

        At this point the berries should be syrupy and succulent! So I like to cut the french toast diagonally and place artfully on a plate, drizzle fruit on top and dust lightly with confectioners sugar. I like to serve this dish with a side of fresh seasonal fruit with cottage cheese, orange juice, and maybe some bacon.


        Enjoy! And have a great weekend!

        Thursday, July 14, 2011

        Jeff's Pozole

        One of mine and Jeff's favorite dates is Dinner. Not just going out to eat, but we like to get excited about a meal idea we come up with, write out a grocery list, go to the store together, make the meal together, partake of the meal together, and clean up together! It's SO much fun!

        Yesterday, Jeff got a wild hair to look through a cookbook I bought for him over a year ago. The NFL Gameday Cookbook by Ray "Dr. BBQ" Lampe. In it he found a recipe for Pozole, a Mexican stew made with hominy. He decided that should be the first recipe posted to share. It is really delicious, and totally a "man food" that we will be making come football season! (We made some changes to the original recipe.)

        For Jeff's Pozole you will need:

        • 1/2 Cup olive oil
        • 1 garlic clove - minced
        • 2 pounds pork roast - cut into 1 inch cubes
        • 1/2 Cup all-purpose flour
        • 2 Cups carrots - roughly chopped
        • 1 Cup yellow onion - chopped
        • 2 - 3 jalapenos - diced, with seeds and veins removed
        • 2 small cans of diced green chiles
        • 1/2 Cup chili powder
        • 2 teaspoons dried oregano
        • 2 teaspoons salt
        • 1  teaspoon black pepper
        • 1 - 32 ounce can of hominy - drained and rinsed (If you have dried hominy, boil 2 - 2 1/2 Cups in a medium sauce pan of water until tender.)
        • 1 - 15 ounce can of pinto beans - drained
        • 5 Cups chicken stock - divided

        For Garnish:
        Green onions - chopped
        Your choice of cheese
        Sour cream
        Cilantro - chopped
        Limes


        To Make:
        1. Dice pork and place in a bowl with the flour. Toss until coated.
        2. In a large pot, heat olive oil and sauté garlic until soft.
        3. Add pork and brown. Remove pork and set aside.
        4. Sauté onions, carrots, jalapenos until tender.
        5. Add green chiles, chili powder, hominy, beans, and 3 Cups chicken stock.
        6. Bring to a boil, reduce heat and simmer for 20 minutes.
        7. Add pork back into the pot along with remaining 2 Cups of chicken broth.
        8. Cover and simmer for approximately 45 minutes - 1 hour.
        9. Garnish with your favorite toppings.
        10. Game Time!

        Wednesday, July 13, 2011

        Utensil Essentials

        Anyone close to me knows I enjoy a good kitchen gadget! For you newbies out there, it's probably pretty obvious that one cannot cook without the right tools. And it is much more fun and time efficient when you can cook with the appropriate tools. So I am going to share a list of basic kitchen utensils I think every cook should have. Baking is a whole other ball game. (You ladies setting up Wedding Registries take note!)
        1. Good Pots & Pans - These are an investment, but something you will use almost daily! A good set will last you at least 10 years, if not a life time. Heavy and sturdy are key. We received a set of Emril's Tri-Clad cook ware as a wedding gift and I love them. And make sure you have 2 stock pots.
        2. Crock Pot - I use mine all year! Autumn and winter are a given with stews, soups, and roasts. But I even just made tender and juicy country style ribs in our crock pot a few days ago. These can range anywhere from $25 - $200. Ours was around $40 and I can't imagine what the difference would be with one that costs more.
        3. Good Knives - These too can be a splurge. Something mid price range is a good investment if you can't afford Wusthov. A stainless steel blade is good and make sure it's one that runs down the length of the handle which gives them much more durability and balance. Ours are Chicago Cutlery and are not necessarily something to scream about, but good quality. We have had them for almost 2 years and they are just now needing a little sharpening.
        4. Whisk - My favorite is a small wire one from Pampered Chef that works great in sauce pans and drink glasses alike.
        5. Rubber Spatulas & Bamboo Spoons- Every shape and size! I have a skinny one from Pampered Chef that fits in the smallest tomato paste can all the way to a jumbo one that scrapes my biggest mixing bowl with ease.
        6. Nylon Tongs - Perfect for turning chicken breasts in a pan and even tossing noodles in sauce.
        7. Cheese Grater - Need I say more? It's a must!
        8. Various Measuring Cups & Spoons - I have some I use for dry and some for wet ingredients.
        9. Parchment Paper - Multi-purpose and SO useful in the kitchen.
        10. Aluminum Foil - Again a must in the kitchen. From covering a dish to prevent unnecessary browning to neatly packaging individual portions for the grill.
        Those are the basics I use multiple times a week, if not multiple times a day! Now if you have the means to do so there are a few others that have made my life a lot easier in the last few years.
        • Blender
        • Food Processor
        • Citrus Juicer
        • Citrus Zester
        Of course there are always more tools and utensils one can acquire. These are certainly not the only things filling my kitchen drawers, but if you have good basics, you can cook anything!

        Well... come back tomorrow for a yummy dinner recipe!

        Monday, July 11, 2011

        Let There Be Food!

        In the words of Harriet Van Horne,
        "Cooking is like love. It should be done with abandon or not at all."
        Breaking bread with others is an instant ice breaker. And those we share a meal with typically soon become friends - if they aren't already. Food has always been the main event of any party, or week day really, of my entire life. My family is obsessed with food, good food. I don't know how a person could grow up in this kind of environment without cultivating some sense of respect and love for food and those who prepare it.

        My mother, Jen, is an excellent cook. And in the kitchen during my childhood I was her sous chef. At an early age I was her right hand man er... girl, chopping peppers and onions, buttering pans, grating cheese, and most importantly - acting as the taste specialist. I can lick a spatula or beater as good as any! I fell in love with the kitchen... I can't describe the feeling I get when holding a sturdy pan with sauteing onions in my hand over a hot stove. And even more so when I'm pouring chocolate cake batter into a buttered cake pan. There is something so gratifying about that cake being cooled and set atop a beautiful cut crystal dish with whipped frosting adorning it like chocolate clouds. I digress...

        Mom is one of those cooks that "wings it". She can adjust a recipe and add a twist here or there that personalizes a dish to perfection! With this blog, my intention is to cook and bake with abandon, and learn this skill of hers. All the while blogging my findings and sharing them with you! My husband, Jeff, is hoping this also lands him some delicious "samples". :) That's all for now - Come back hungry! ~Amber